Using the NEON Shiny App in RStudio-Server
Description:
The Download and Explore NEON Data API tutorial covers the basics of downloading data directy into R and RStudio via the neonUtilities R package.
Our team created a NEON Shiny App for interfacing with the NEON API in R Studio in a graphical manner.
The Shiny app can be launched using Docker, in RStudio or an RStudio-Server.
When started the Shiny app will create a new folder called ~/NEON_Downloads in the home working directory. For the R Studio instance on CyVerse, this is set as /home/rstudio/NEON_Downloads.
Data that are selected and downloaded go into this folder and are organized using the same ontology as the NEON Data API.
Prerequisite
In the previous section, you should have started a RStudio Server in the Discovery Environment https://de.cyverse.org
Download the Shiny App
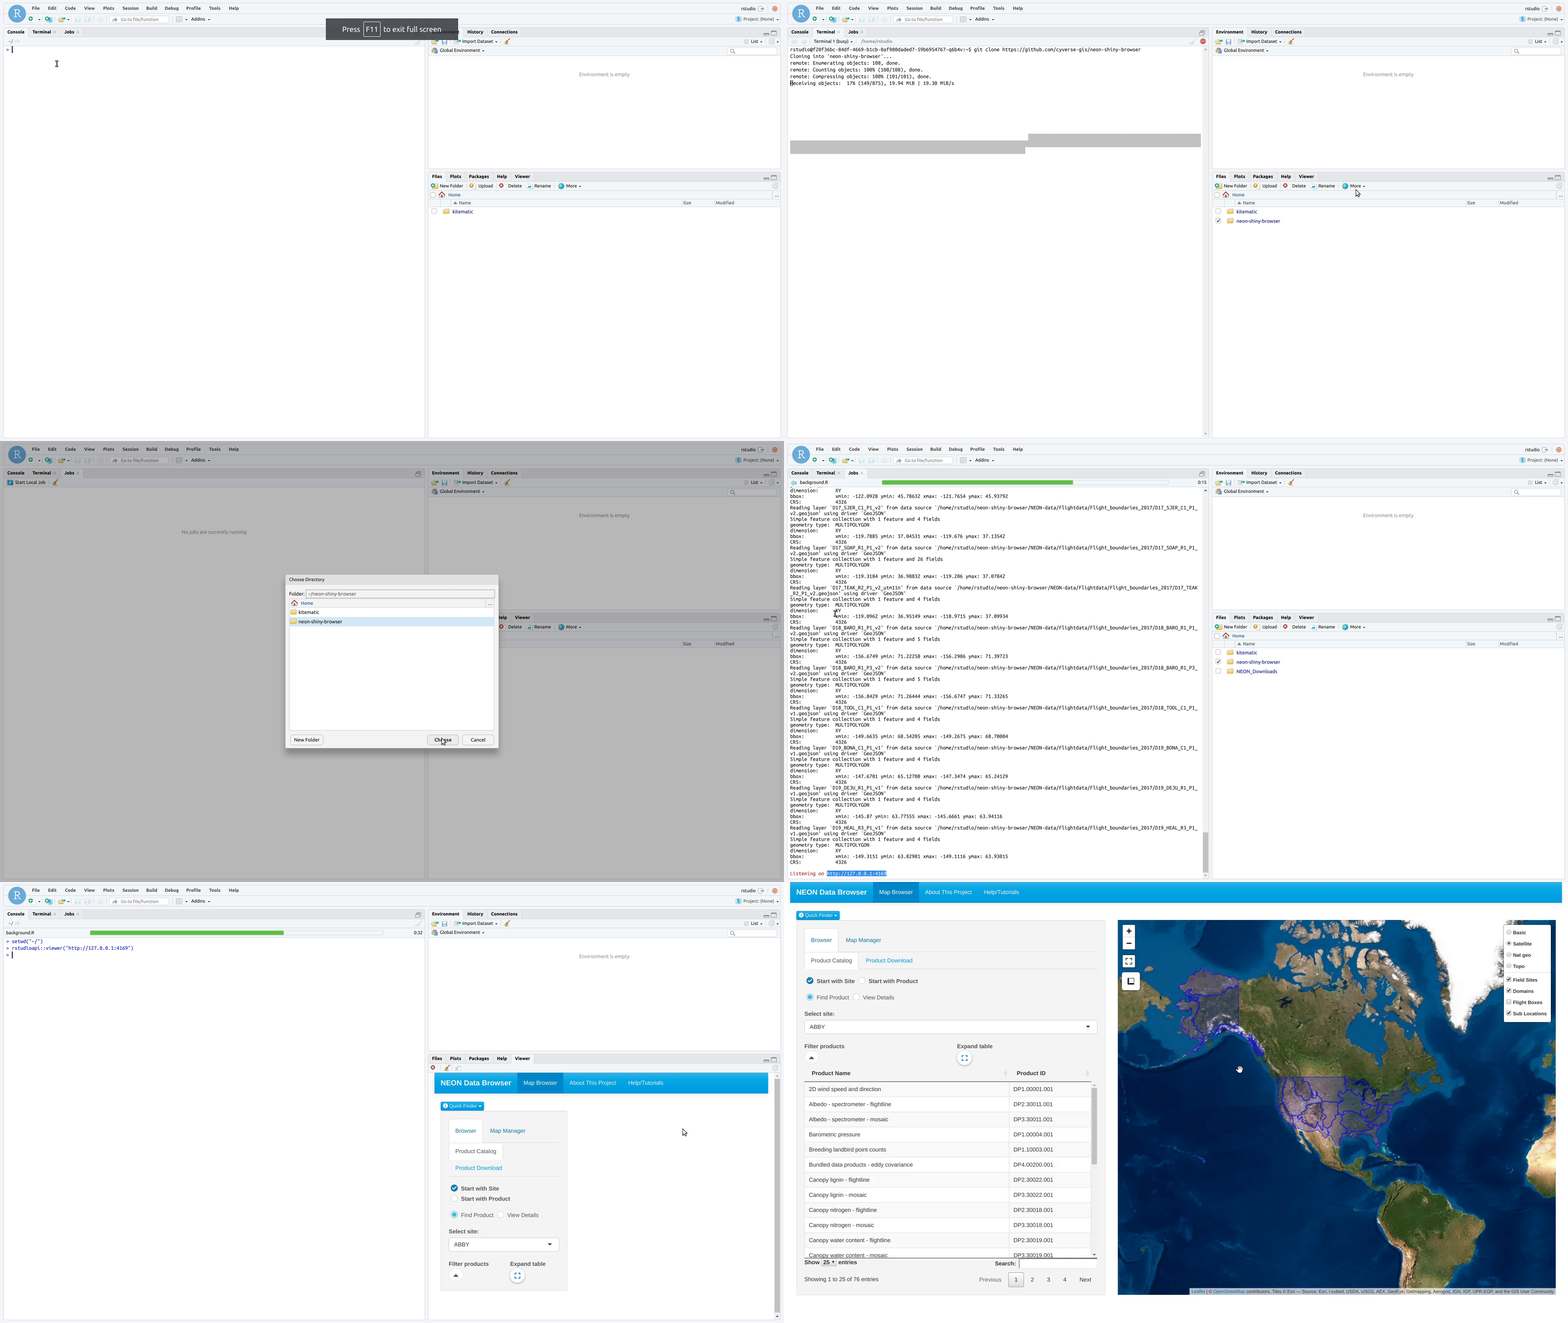
1. Have an instance of RStudio-Server in VICE already started, see Your Workspace for details.
2. Click on the Terminal tab in the R Console
3. Type or copy this text into the linux terminal:
git clone https://github.com/cyverse-gis/neon-shiny-browser
4. The contents of the Git Repository should now be in your workspace files in the lower right of RStudio
5. Set the working directory to the neon-shiny-browser directory
Start the Shiny App
RStudio-Server has a feature called “Jobs”” which can run the Shiny app as a background process. This will keep the R Console active and allow us to continue work in the R Studio while the App is running at the same time.
6. Select the Jobs option in the Console.
7. Set the working directory as ~/neon-shiny-browser and select the background.R script.
8. Start the Job as a background process.
9. This particular App will install a few missing R packages before it starts. Don’t worry, it will do this automatically. After it has installed the missing package dependencies, it should begin to echo out logs and then start to run on the localhost address number 127.0.0.1 using a randomly assigned PORT number:
(A bunch of stuff above this...)

Reading       layer `D19_HEAL_R3_P1_v1' from data source `/home/rstudio/      neon-shi      ny-browser/NEON-data/Flightdata/      Flight_b      oundaries_2017/D19_HEAL_R3_P1_v1      .geojson' using driver       `GeoJSON      '
Simple f      e      ature collection with 1 feature       and 4 fields
geometry             type:  MULTIPOLYGON
dimensio      n      :      XY
bbox:                 xmin: -149.3151 ymin: 63      .82981 xmax: -149.1116       ymax: 63.93015
CRS:            4326

Listening on http://127.0.0.1:5716
The part we want to copy is the
http://127.0.0.1:5716, the5716number here will be randomly assigned
10. Back in the R Console, type the following using the PORT number from the job:
rstudioapi::viewer("http://127.0.0.1:5716")
11. The App should start to run and appear in the lower right “Viewer”. You can pop the app out into its own browser tab, and begin to use it.
Downloading Data via the NEON API
12. Browse the App and find a dataset that you’re interested in downloading.
13. AOP data use a slightly different protocol in the NEON Data API, so make sure to select the AOP data check box when you are ready.
14. After you’ve initiated the download, the data will begin being downloaded to the ~/NEON_Downloads folder.
When the data download is complete you will get a notification.
15. Important: Your data are in a directory which is not set as the WORKDIR by the Docker container in the Discovery Environment. This means that your downloaded data will NOT be saved back to the Data Store when your analysis completes.
Output/Results
| Output | Description | Notes |
|---|---|---|
| NEON Data! | Data should be in the /home/rstudio/NEON_Downloads directory |
These data use the same file-tree hierarchy as the NEON Data API. |
Description of output and results
IMPORTANT: These data are currently running in a virtual machine, which will soon be going away, either when it times out, or you turn it off. You need to make sure that your data are moved to a data repository, like the CyVerse Data Store, or downloaded to your localhost, before you turn this analysis off.
Any data which are in the working directory of the instance (likely the /home/rstudio/ directory will be preserved in the /iplant/home/<username>/analyses/<the-app-name>_analysis1-<DATE-TIME-of-job-starting> directory). Any data which are in other paths will not be preserved
Fix or improve this documentation
- Search for an answer: CyVerse Learning Center
- Ask us for help:
click
 on the lower right-hand side of the page
 - Report an issue or submit a change: Github Repo Link
- Send feedback: learning@CyVerse.org


